 |
ReconstructMe SDK
2.0.819-89134
Real-time 3D reconstruction engine
|
 |
ReconstructMe SDK
2.0.819-89134
Real-time 3D reconstruction engine
|
Coordinate systems involved in ReconstructMe
Since ReconstructMe operates in three dimensional space, the involved coordinate systems form three dimensional spaces. ReconstructMe uses right-handed coordinate systems which are represented as 4 by 4 homogenous matrices. The Transform explains the memory layout details and how to work with those matrices.
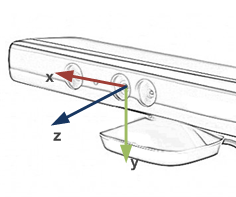
The first coordinate system you should be aware of is the sensor coordinate system. This coordinate system is attached to the sensor in the following way

The main purpose of the sensor coordinate system is specify how a sensor views the environment and produces its data. That is, when holding the sensor horizontally and looking through the sensor into the room, the positive x-axis extends to the right, the positive y-axis points towards the floor and positive z-axis extends into the room.
In the world coordinate system the reconstruction and mesh extraction is performed. The reconstruction volume is defined as an axis aligned bounding box with respect to the world coordinate system. For example, the following settings
define a reconstruction volume that extends 500 units in each direction around the origin of the world coordinate system.
Since we don't have any absolute reference in the space, the absolute location of world coordinate system is initially undefined or arbitrary. Once the first sensor data is fed into the reconstruction volume (reme_sensor_update_volume), the position and orientation of the world coordinate system 'freezes' until the volume is resetted to empty state (reme_volume_reset).
The absolute position of the world coordinate system in real-space is thus defined
By default the initial virtual sensor position is the identity matrix, meaning that the sensor frame coincides with the world frame. You can use reme_sensor_set_position and reme_sensor_set_prescan_position to modify this relationship. Since version 1.6 the standard configuration files position the reconstruction volume around the origin of the world coordinate system, meaning that by default the sensor starts in the middle of the volume. If this is not intended, use reme_sensor_set_prescan_position to re-position the sensor automatically outside of the volume or manually set the position by reme_sensor_set_position.
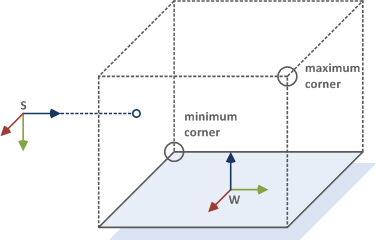
The illustration below should help you grasp that concept. In virtual space the position of the sensor has been set to be behind the world coordinate system. Thus, the world coordinate system is floating infront of the sensor in real-space. When the reconstruction starts, the world coordinate system freezes at the current position and the sensor starts to reposition itself with respect to world coordinate system via tracking (reme_sensor_track_position).

The world coordinate system is important to you as the reconstruction volume is defined with respect to it and surfaces (Surface) will be generated with respect to it.
We know that these are the hardest concepts to grasp when starting with ReconstructMe (or 3D vision in general) which is why we devoted a complete example on how to apply the above knowledge in practice. See OptimizeFor3DPrintingExample for more insight.
3D printers, in contrast to 2D printers, print three dimensional objects instead of flat sheets of paper. There are different techniques on how these devices work, but one common point is that there is a 3D printer coordinate system in which the surface model has to be placed when you intend to print it.
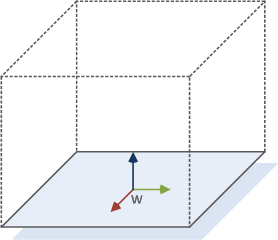
A lot of printers define a platform, i.e a planar region, that defines the floor of the print. The illustration below shows such a platform with the printer coordinate system in the center of the platform (x-axis:red, y-axis:green, z-axis:blue).

Ideally, the resulting surface of our reconstruction already sits on this platform and needs only to be scaled to fit the printer space. This example shows you how to set up the world coordinate and the sensor position to accomplish this.
As mentioned in section CoordinateSystems, the world coordinate system is arbitrary until the reconstruction starts. So, as we are free to choose, we assume that our world coordinate system coincides with the printer coordinate system (nothing todo in the code at this point).
Next, we need to define the reconstruction volume with respect to the world coordinate system. The reconstruction volume is defined as an axis-aligned box with respect to the world coordinate system.
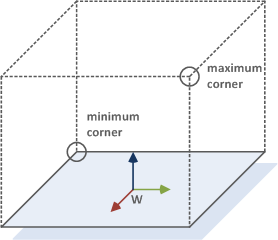
For this example we let our reconstruction volume to extend from the platform towards positive z-axis about 1 meter in length and extend on the other axes from -500 to 500 millimeter. This gives us a reconstruction volume similar to the one illustrated below (note that in reality the printer platform is not as big as shown below).

Axis-aligned boxes, as our reconstruction volume, are often represented by a minimim and maximum corner point. Both points are marked in the illustration below.

The corner points of the reconstruction volume and can be modified via the fields volume_min and volume_max that are part of the reconstruction options (reme_context_bind_reconstruction_options). Here's a snippet that does that (see Accessing and Modifying Options for more details on how to modify/access options)
As stated in the section CoordinateSystems, the initial sensor position coincides with the world coordinate system. For this tutorial we will set the initial sensor position to be to the left of platform, looking towards the platform from the outside of the reconstruction volume. The following illustrations shows this

This requires a Transform which can be set up by hands or one can use the utility method reme_transform_look_at to simplify the process. This method takes the new origin of the camera, a reference point the camera looks at and a new up-vector. From these values the method establishes a sensor coordinate system with respect to the world coordinate system.
The matrix mat in the above example equals the matrix mat2 in the following handwritten example
The rest of the example equals standard scanning code as shown in the one-minute example. Remember, that the world coordinate system is fixed when the reconstruction starts. To achieve optimal results with the above settings, hold your sensor horizontally and about 1 meter away from the object to scan. Then the center of resulting mesh will coincide with the printer platform and z-axis will point towards the ceiling.
 1.8.2
1.8.2