Support
|
Setup
Make sure your sensor is connected to the computer. In case your sensor requires an external power supply, also ensure the adapter is plugged-in. In the Windows device manager check if your device is listed and marked as functioning correctly. Ensure that you have the latest sensor drivers installed.
The following table sums up the minimum hardware requirements and provides links to update necessary vendor specific drivers.
ReconstructMe already supports a variety of commodity 3D cameras and we are working hard on integrating new and exotic ones as soon as we take notice of them. We felt it is about time to put details into perspective. Therefore we are kicking off a camera review series to cover sensor specifications, installation instructions and more.
Microsoft
Kinect v1 for WindowsKinect v1 for xBox 360
PrimeSense
PrimeSense 1.08PrimeSense 1.09
Structure
structure.io
Virtual devices
File SensorNetwork SensorExternal Sensor
ReconstructMe performs most of its operations directly on the GPU. ReconstructMe utilizes OpenCL to communicate with your device. Therefore, ReconstructMe supports all graphic cards that support OpenCL. Please consult your vendor specifications to ensure that your GPU is compatible with ReconstructMe. Usually all decent cards from NVIDIA, AMD or INTEL are supported. Note that OpenCL is not limited to graphic cards but can work with any accelerator device, such as CPUs. Most vendors offer OpenCL drivers for their CPUs as well. Make sure to install the latest driver before running ReconstructMe.
OpenCL.dll provides the language ReconstructMe uses to communicate with your graphics card. OpenCL.dll is usually being installed by your display driver. Older display drivers, however, do not support OpenCL.dll. Therefore, please update your display driver and note that your graphics card needs to support OpenCL (which most decent graphics cards do) to run ReconstructMe.
|
Licensing
No, a license will not effect reconstruction performance. Instead, please check if your system has a powerful graphics card inside. If you have a powerful graphics card, try to update your display driver and make sure that ReconstructMe uses the correct device.
If you need to replace only single hardware components of your computer, chances are that your license still remains valid. The license holds a certain number of hardware hashes (usually 5). At least 50 percent of the hardware hashes of the license have to match the current system hardware hashes. If more components broke or you had to replace your entire machine, please write an E-Mail to shop@profactor.at including the order number and the issue you ran into. Note that E-Mails without order numbers will be ignored.
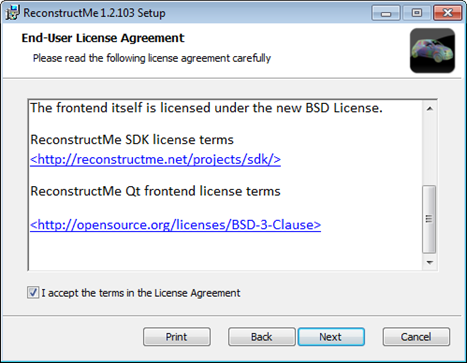
Please place the license file inside
Check if your license expired. Just open the license in your favorite text editor and see the issue_date. From this time, the license is valid for version which are released from issue_date to issue_date +360 days. If so, then your license is still valid, but not for that version. When you have replaced hardware components your license might also become invalid. See How do I get a new license if my computer breaks? for details.
Users can recind from their order within one week after purchase. Please write an E-Mail to shop@profactor.at including the order number and your issue you ran into. Note, E-Mails without order numbers will be ignored.
Your license never expires. The license comes with fixed number of maintenance days. During this period of time you are free to update to newer ReconstructMe versions. After the period you cannot update to a ReconstructMe version that was released after your maintenance period. Consider purchasing a new license or revert ReconstructMe to an older version.
You will need to purchase a ReconstructMe license whenever you use ReconstructMe in an commercial context. Since 15th of September 2015 the ReconstructMe scanning application is free for non commercial applications. As a developer, when you download the ReconstructMe SDK it will run in unlicensed mode by default. This means a set of limitations are active:
ReconstructMe enables / disables and modifies functionality based on the license applied. By default ReconstructMe comes unlicensed and with some limitations. Once you purchase a license the following happens
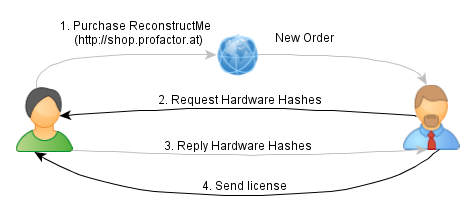
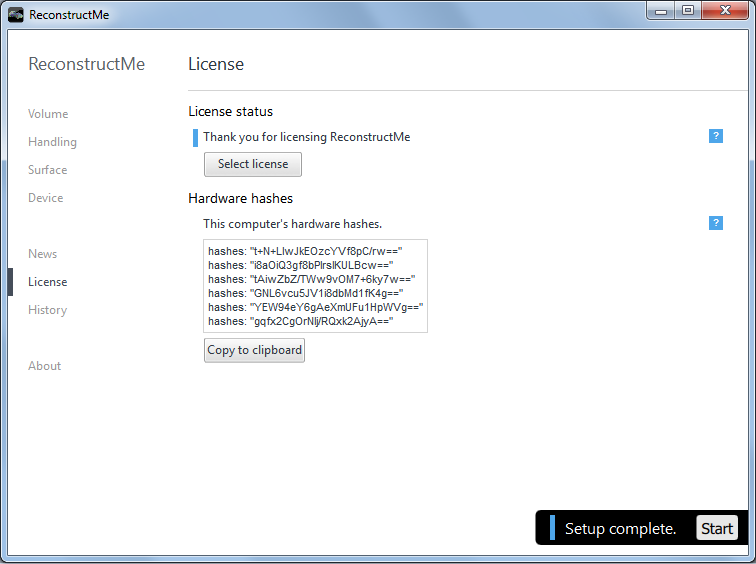
Generate hardware hashes Todo so, start ReconstructMe and copy your hardware hashes to the clipboard using the
Reply to the E-Mail mentioned above and don’t forget to paste the hardware hashes into it. Applying the license This should apply the license and the licensing tab should reflect a valid license as shown below.
Usually the process takes between one and two working days depending on your time-zone and time of purchase. We give our best to serve as fast as we can, but the process is not fully automated. A positive side-effect: you are talking to real humans.
ReconstructMe runs by default in LITE mode. LITE mode is for free but comes with some limitations. By purchasing a license the limitations are removed.
|
Scanning
Please see our usage guide for first steps on scanning with ReconstructMe.
No, a license will not effect reconstruction performance. Instead, please check if your system has a powerful graphics card inside. If you have a powerful graphics card, try to update your display driver and make sure that ReconstructMe uses the correct device.
Make sure that your system meets the minimum hardware requirements. If you own a system with multiple graphic cards built in, make sure that ReconstructMe is configured to use the most powerful one. You can do this by manually selecting the device in the
Make sure your sensor is connected to the computer. In case your sensor requires an external power supply, also ensure the adapter is plugged-in. In the Windows device manager check if your device is listed and marked as functioning correctly. Ensure that you have the latest sensor drivers installed.
Achievable accuracy depends on various factors such as
As you probably have noted by now, it is hard for us to come up with a single number on the accuracy of the ReconstructMe, as it depends on many factors. However as a rule of thumb with most currently available sensors, ReconstructMe achieves under ideal environments an accuracy of 5-8 millimeters on a 0.5 meter part. The following comparison stems from discussions about ReconstructMe accuracy. It compares a high quality structured light scan and ReconstructMe scan of the same object. Worst case deviations are 5mm around object borders. 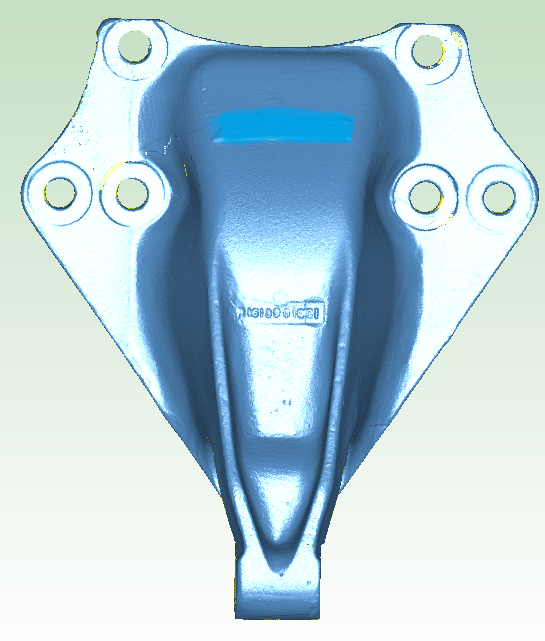
Baseline structured light scan at accuracy +/- 0.1mm 
ReconstructMe scan 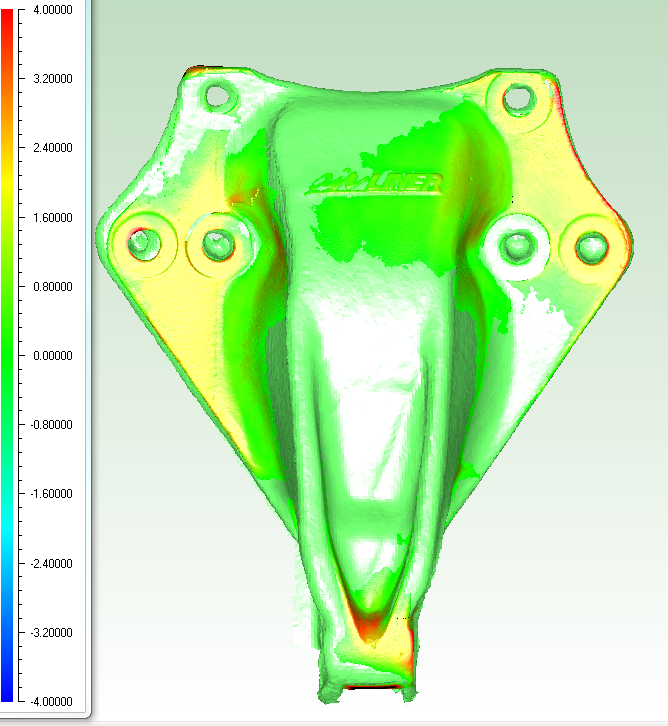
Deviations in mm If you accuracy you can achieve is far from the above, you might want to read about improving the quality of your results: How can I improve the quality of my scanning results?
ReconstructMe extends the selfie idea to 3D. Using the self-portrait feature in ReconstructMe, everyone can generate 3D printable busts in a minute. Below is good example of an 3D self-portrait outcome without any manual postprocessing. What do I need to do?
Your model is now ready to be opened in your favorite 3D printing application or uploaded to any 3D printing service. The video below runs through the above steps. Any best practices?Here are a couple of things to take into consideration when generating selfies for optimized results. Ensure you have enough spaceWhen scanning yourself by turning in front the camera, make sure that you are the only object within the reconstruction volume. Double-check this in the live preview at the Volume tab of ReconstructMe. Rigidness and constant facial expressionTry to avoid changing your facial expression during the scan or the pose of your body. When doing a colorized selfie, avoid changing the position of your pupils with respect to your eye. We’ve built in a couple of helpers in ReconstructMe that will help you to achieve this.
Constant lighting conditionsWhen doing a self scan without the help of somebody else (e.g by rotating in front of the camera) make sure that the lighting in your room is diffuse or use a spot-light that is placed directly on the camera and facing in the same direction. If the room you are sitting in has a window through which light enters, make sure that the window is directly behind the line of sight of the camera. Even better: get the help of a friend who moves the camera around you and who avoids casting shadows on you. Camera placement and calibrationMake sure to place the camera horizontally on eye level height before the scan starts. The same placement should be taken when the scan starts and the camera is weaved around you by a friend. If you get a visible seam artifact in your result do the following
What do I get?When in selfie mode, ReconstructMe generates a 3D bust that is printable without further modifications. Here is what happens in detail
Scanning can be a tedious process if the scanning environment is not optimal. Here are some general tips on how to optimize your scanning results.
This is most likely due to the limitations of the free version of ReconstructMe.
|
Sensors
Table of ContentsIntel is currently doing a major push with it’s 3D sensors. It has several options available; close range like the Intel RealSense F200, and now the Intel RealSense R200. It seems to be destined to become part of future Intel hardware like it’s notebooks, but it is also available as a developer kit. Currently the R200 can be bought here.
InstallationIntel’s sensor is rapidly evolving, so they are regularly updating their drivers and SDK. As the time of the writing, this is how to install the R200:
SpecificationsImaging Component Overview:
Available Resolutions. Bold settings are recommended.
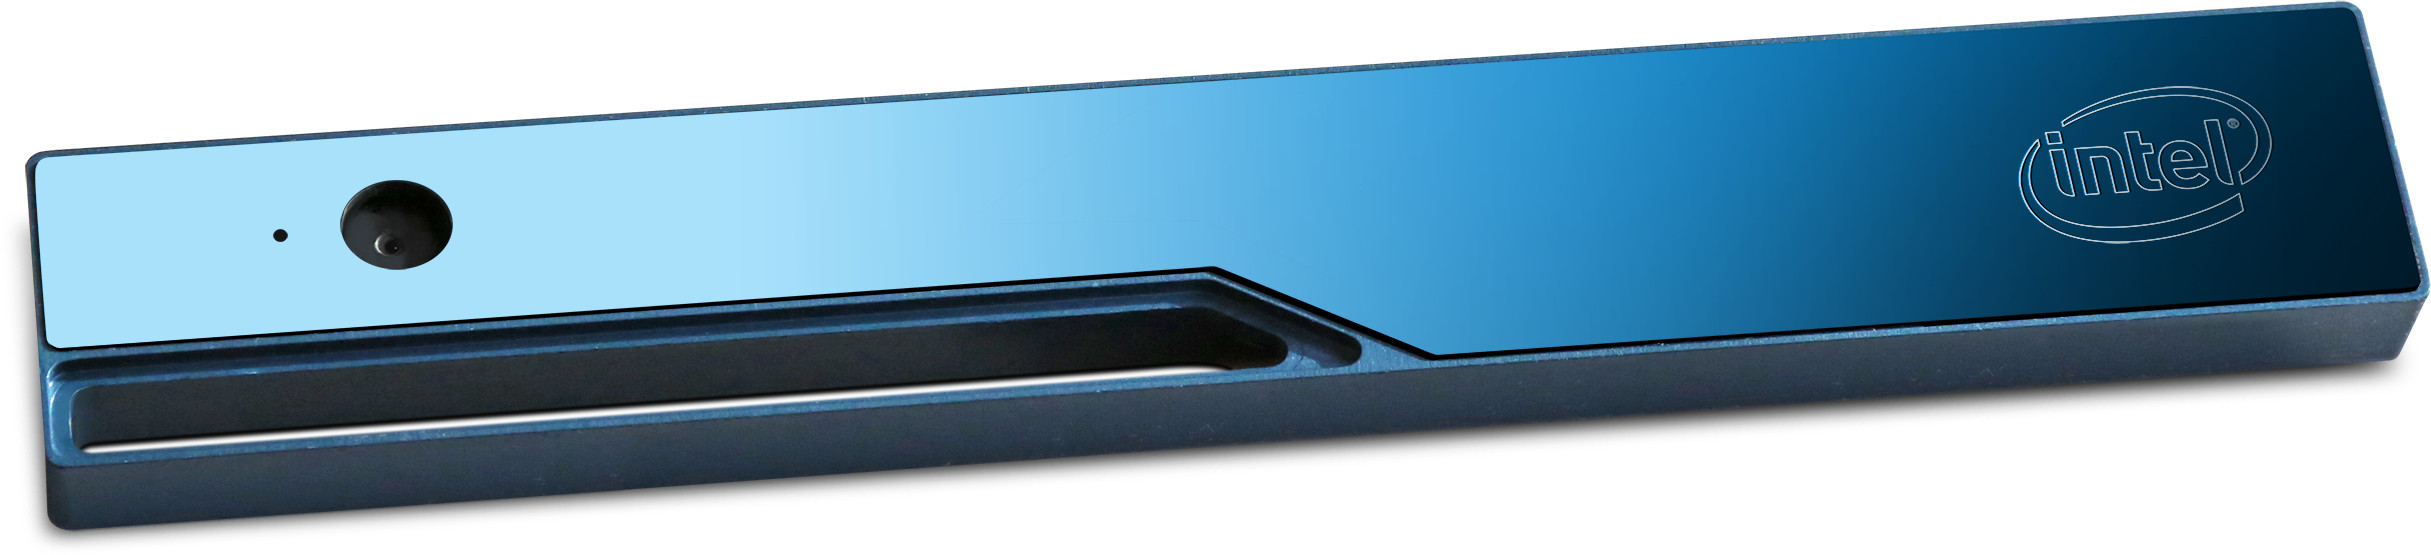
Body & DesignThe Sensor looks slick, and is very compact. It is approximately 130 x 20 x 7mm, making it one of the most compact sensors on the market. It has to be connected to a USB3 connector, and does not require any extra cables. On the back side there is a magnet, which makes it possible to clip the sensor to metalic objects like the back of a tablet. Technology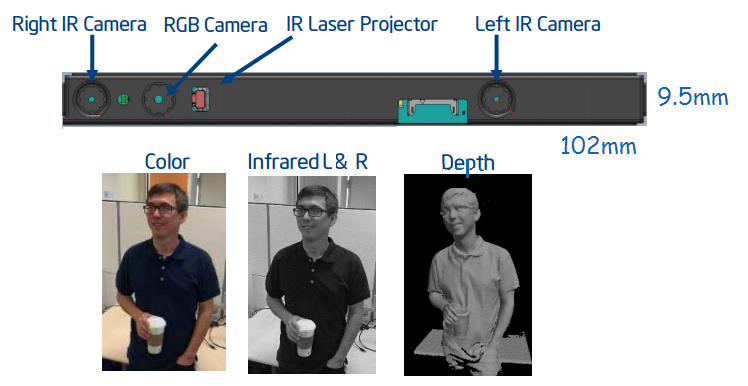
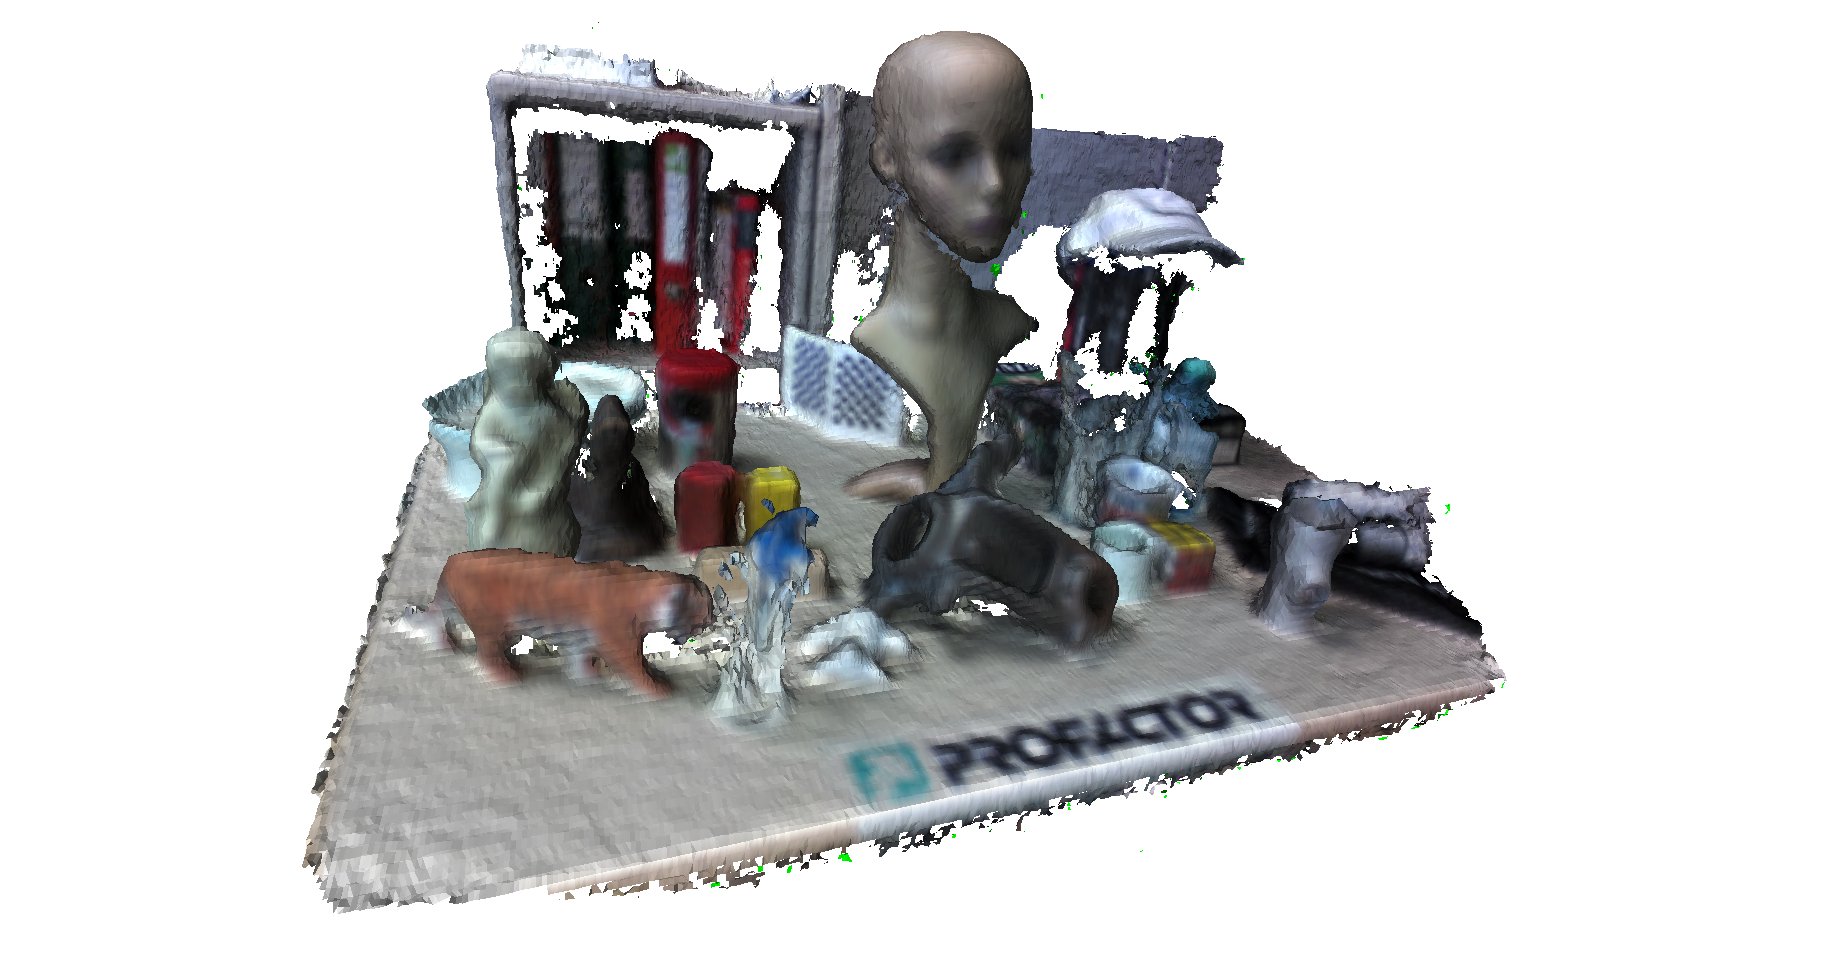
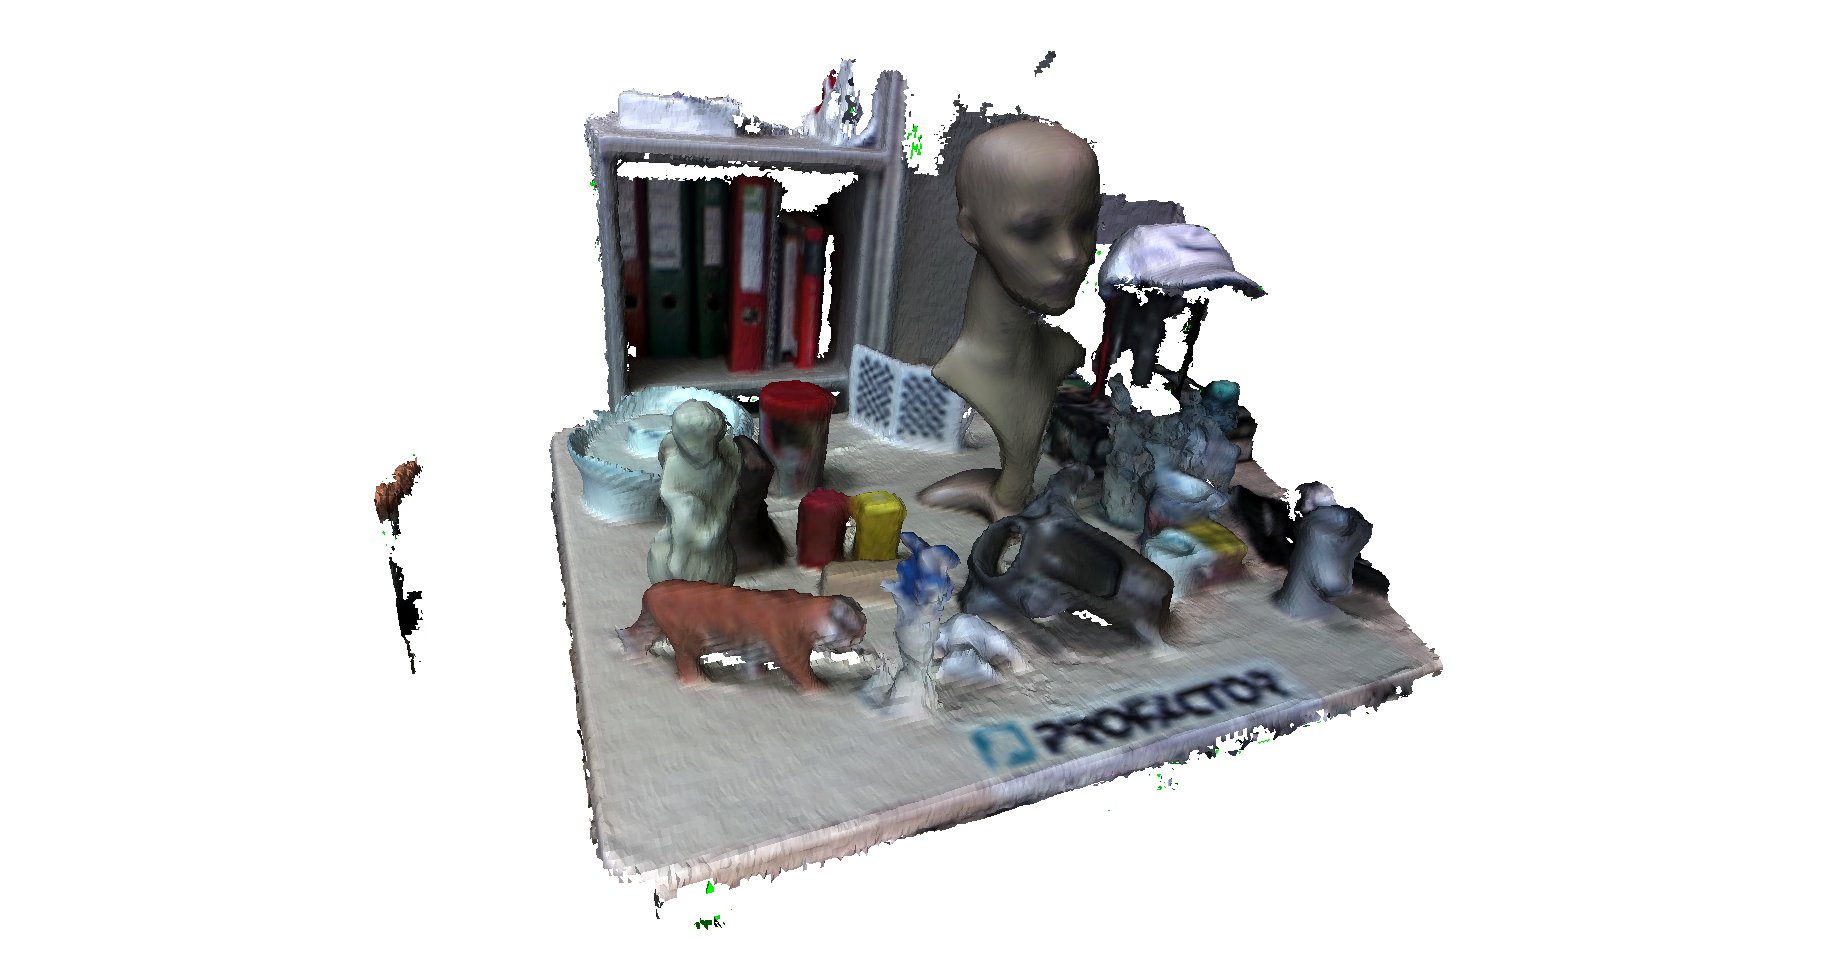
Image Source: Intel RealSense Developer Kit Behind the shiny body of the dev kit there is more than it seems. The sensor actually has three cameras: two IR cameras (left and right), and one RGB camera. It uses these two cameras for stereo vision (unlike the PrimeSense/Kinect technology, which uses a speckle pattern). Additionally, this camera also has an IR laser projector to help the stereo vision recognize depth at unstructured surfaces. Scan ResultsTest SceneTo evaluate the performance of the R200, we have set up a test scene that contains a lot of different objects that provide a challenge for most 3D sensors. Here is what it looks like: 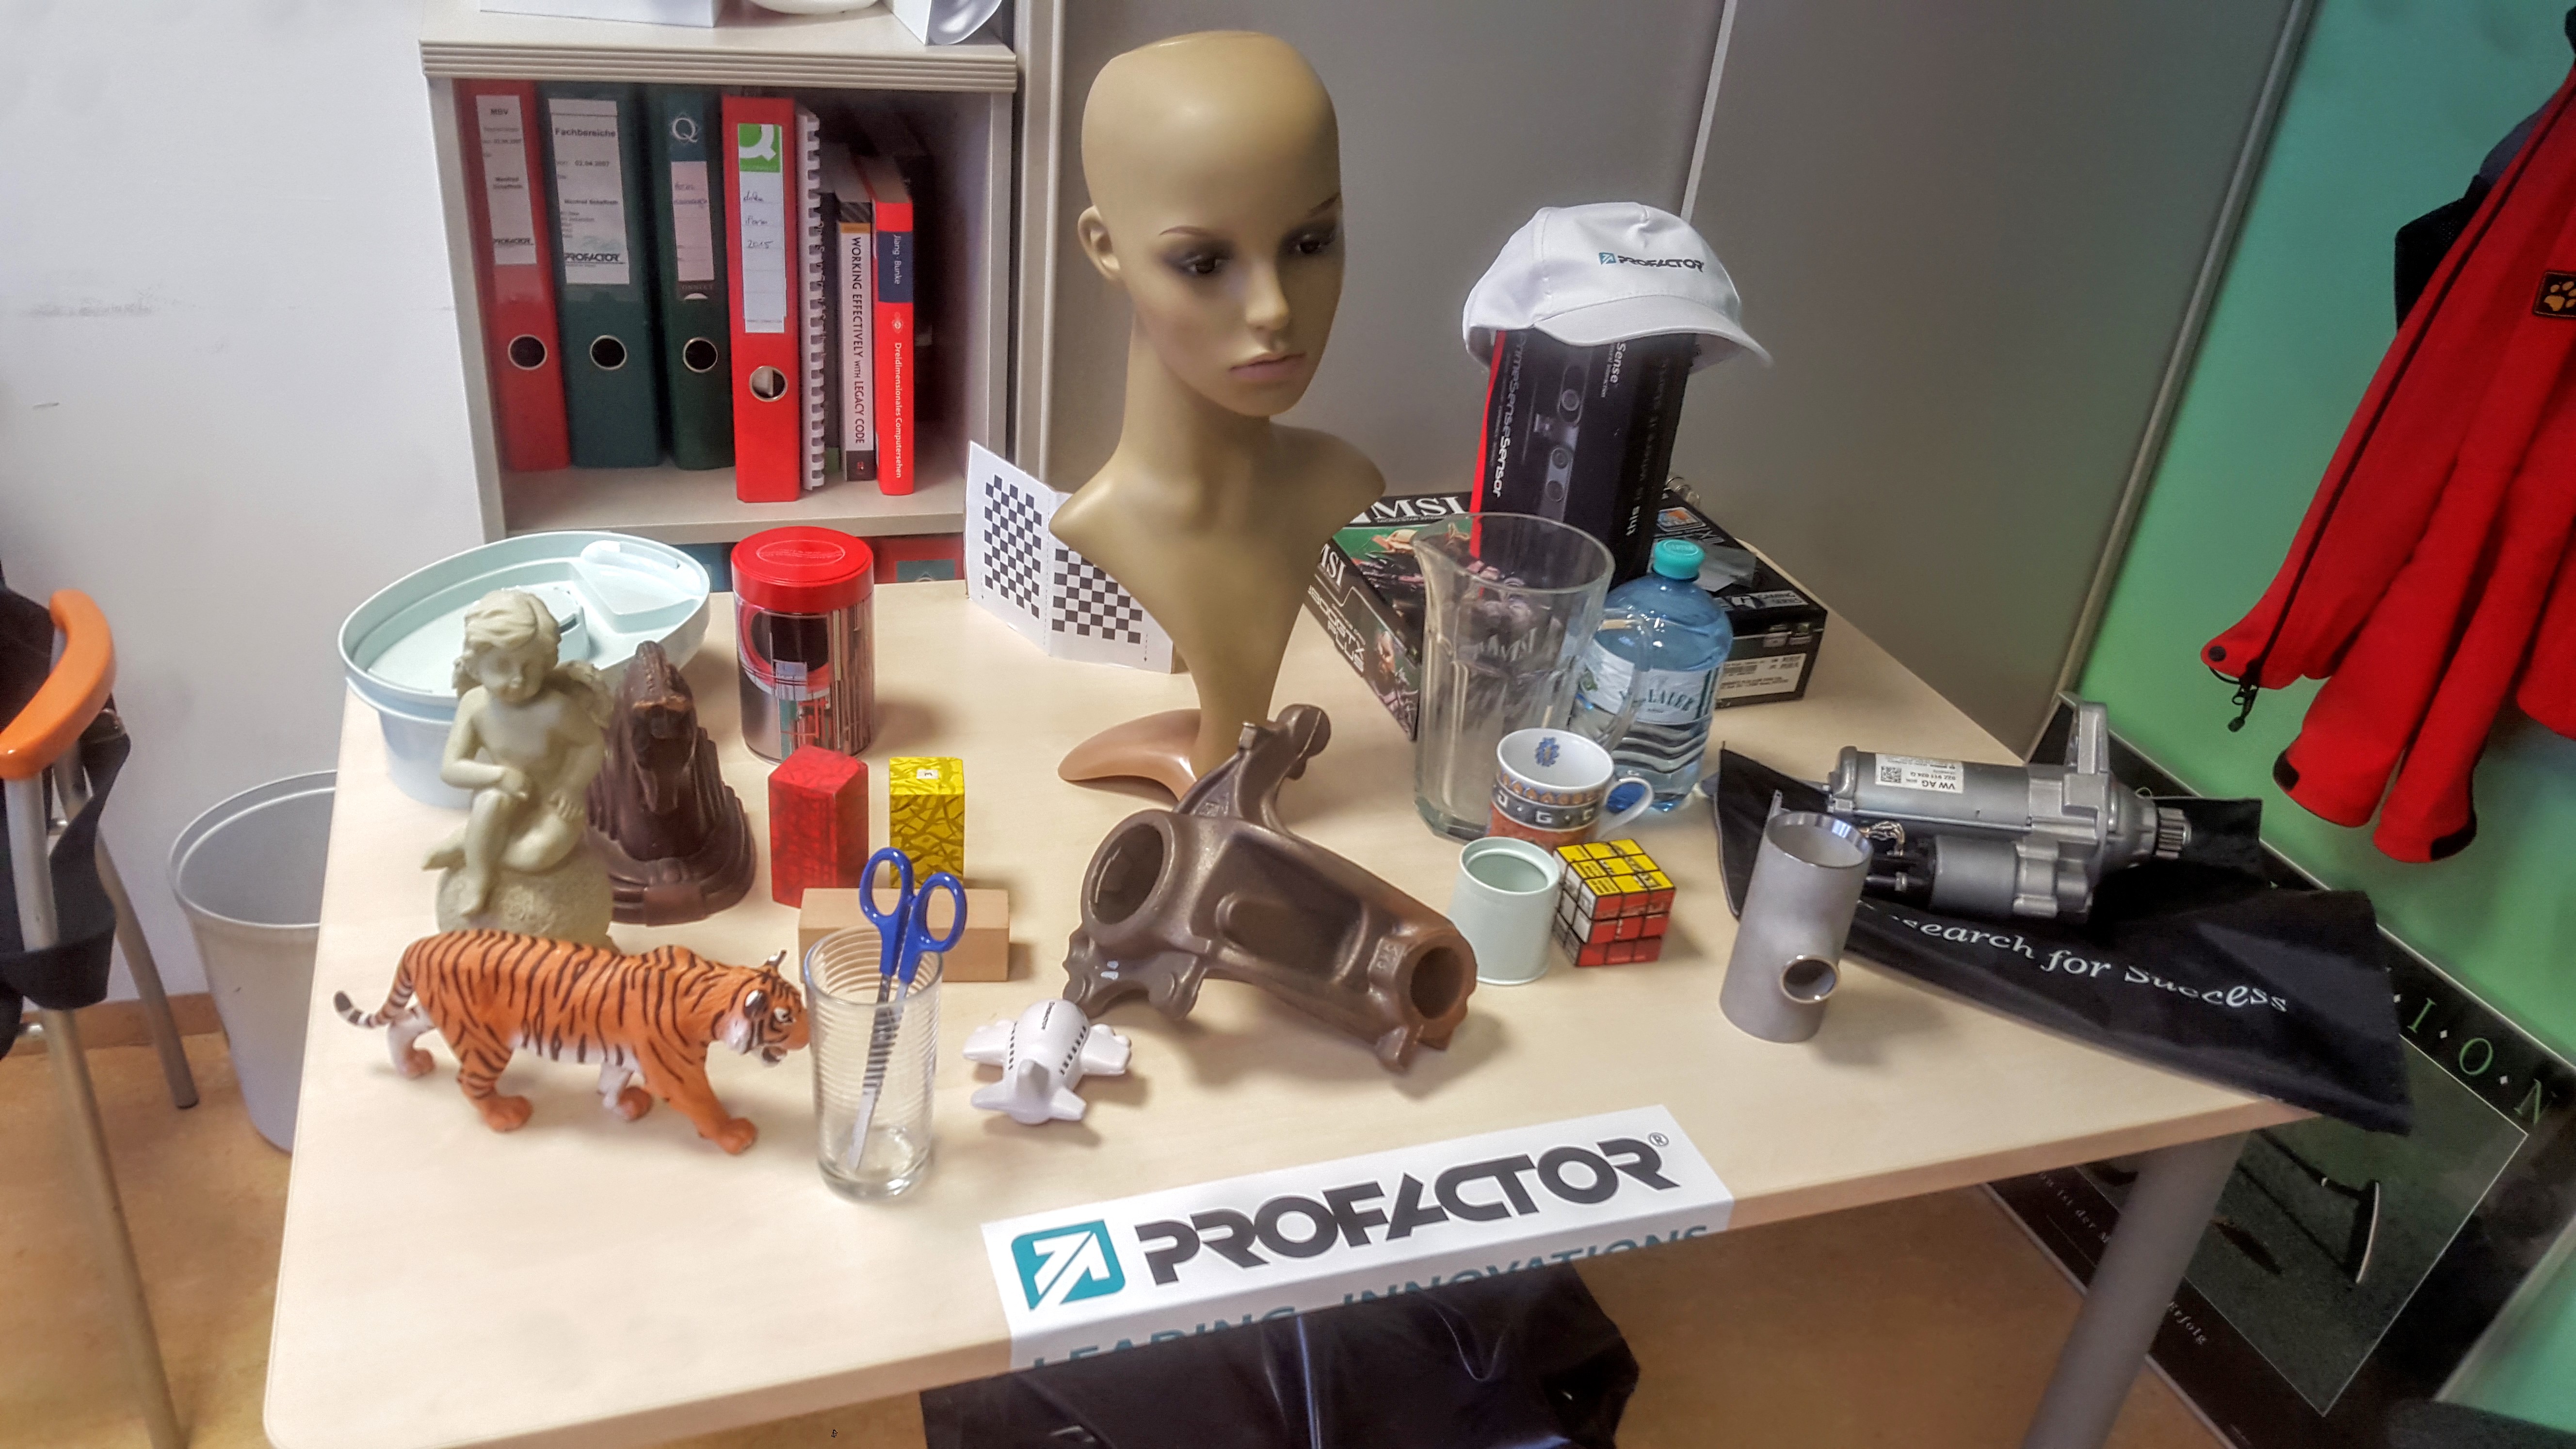
Image Source: Profactor From left to right, here is what you should look at when checking the comparisons:
We have scanned the scene with the following procedure:
We have repeated this scanning process for several different setups of the R200, and with different ReconstructMe optimization settings. All processing was done on a Windows 8.1, Intel i5-370 @3.4GHZ CPU, and with an AMD Radeon HD 6900 Series graphics card. 30fps, color 1920×1080, depth 480×360This mode requires a very fast pipeline between the CPU and the GPU, because both the high resolution color and depth needs to be uploaded to the GPU for each frame. Let’s see how ReconstructMe can deal with this data. Optimize for reconstruction Speed
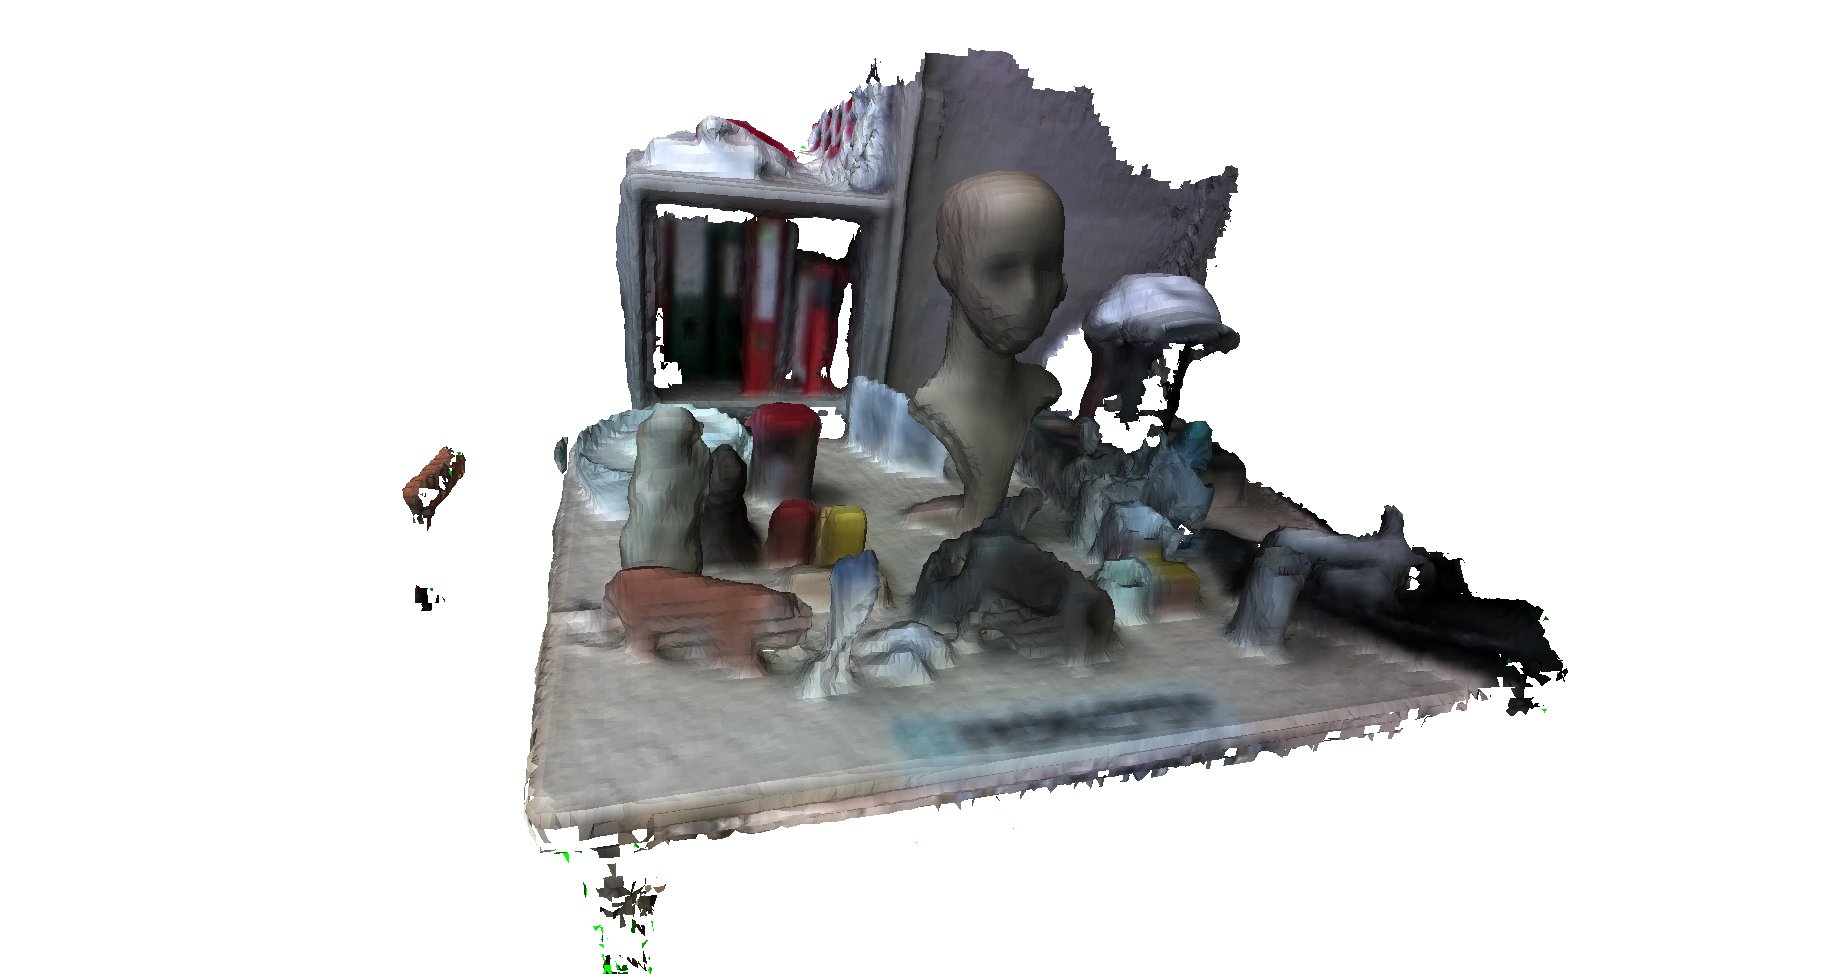
ReconstructMe scanning is smooth, but the scanned quality is obviously not very high. Using the high resolution R200 with the speed mode seems like a waste. Not recommended. Balance reconstruction speed and quality
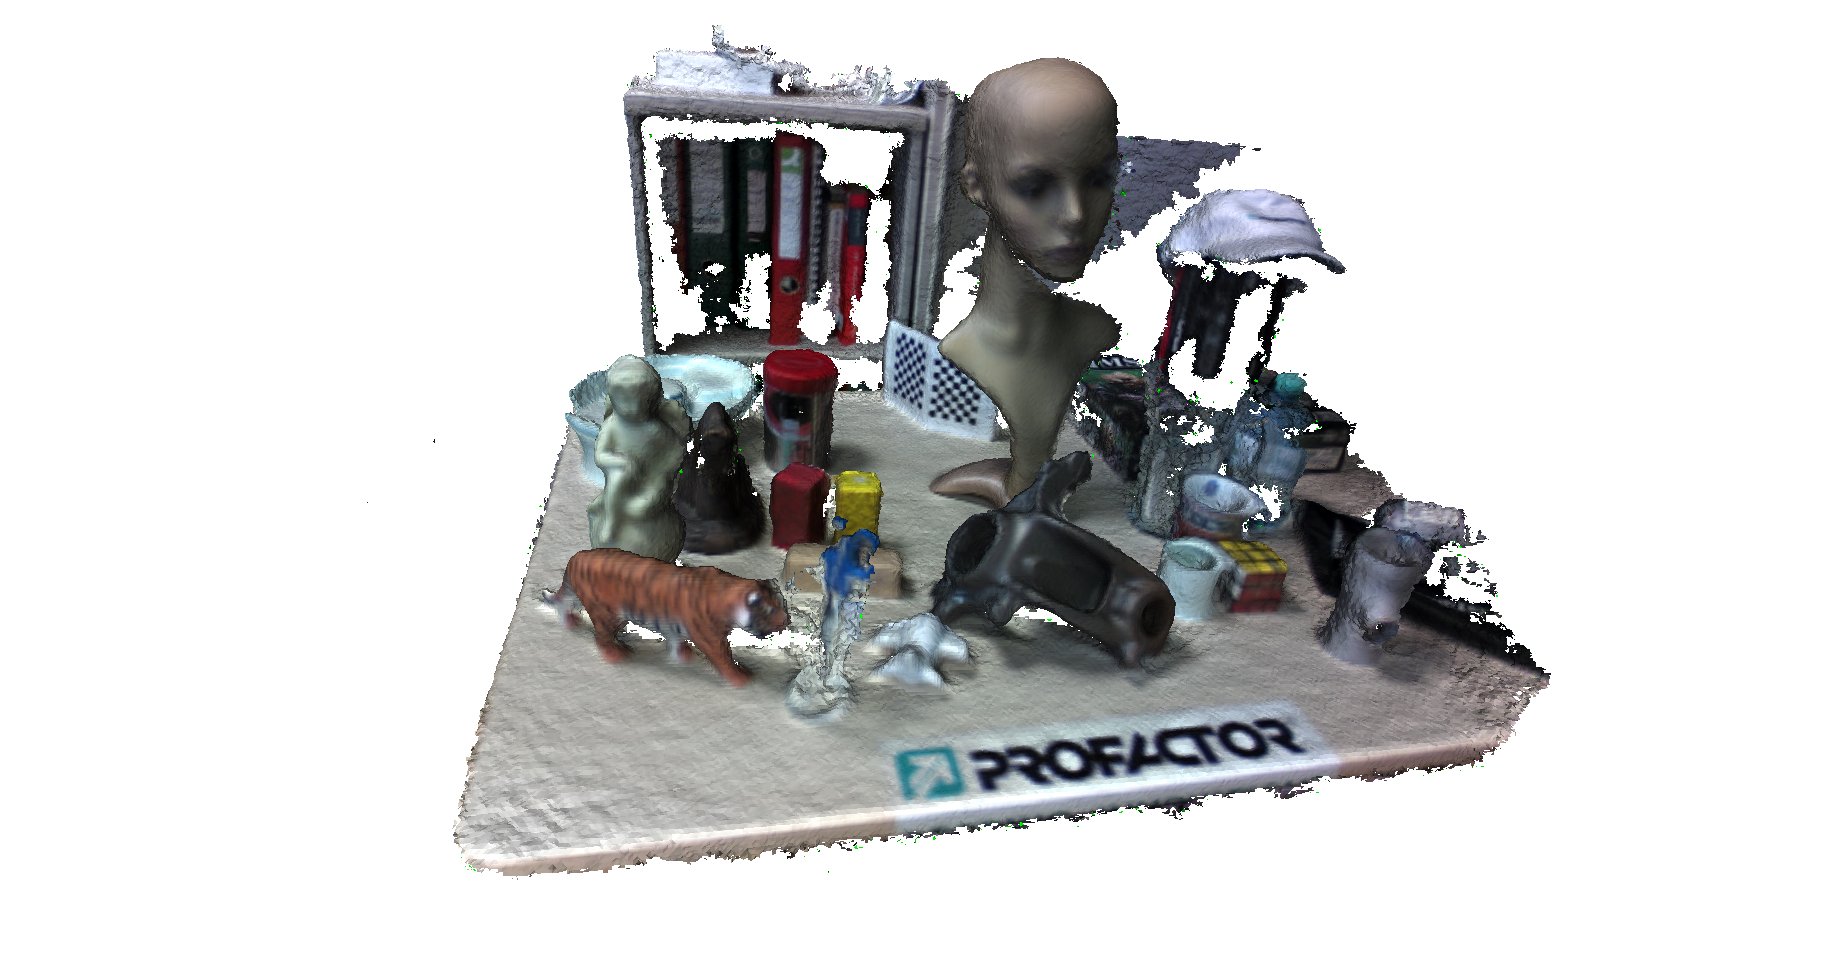
This setting makes perfect use of all available resources. Scanning is pretty smooth, and the coloring is nice. The checker board pattern behind the head is clearly visible. The heads structure looks well defined. To my surprise, it produces reasonable quality with the shiny coffee cylinder. The tiger’s stripes are unfortunately not clearly visible. All objects except the ones made of glas were captured. No problems with black objects. Maximize quality
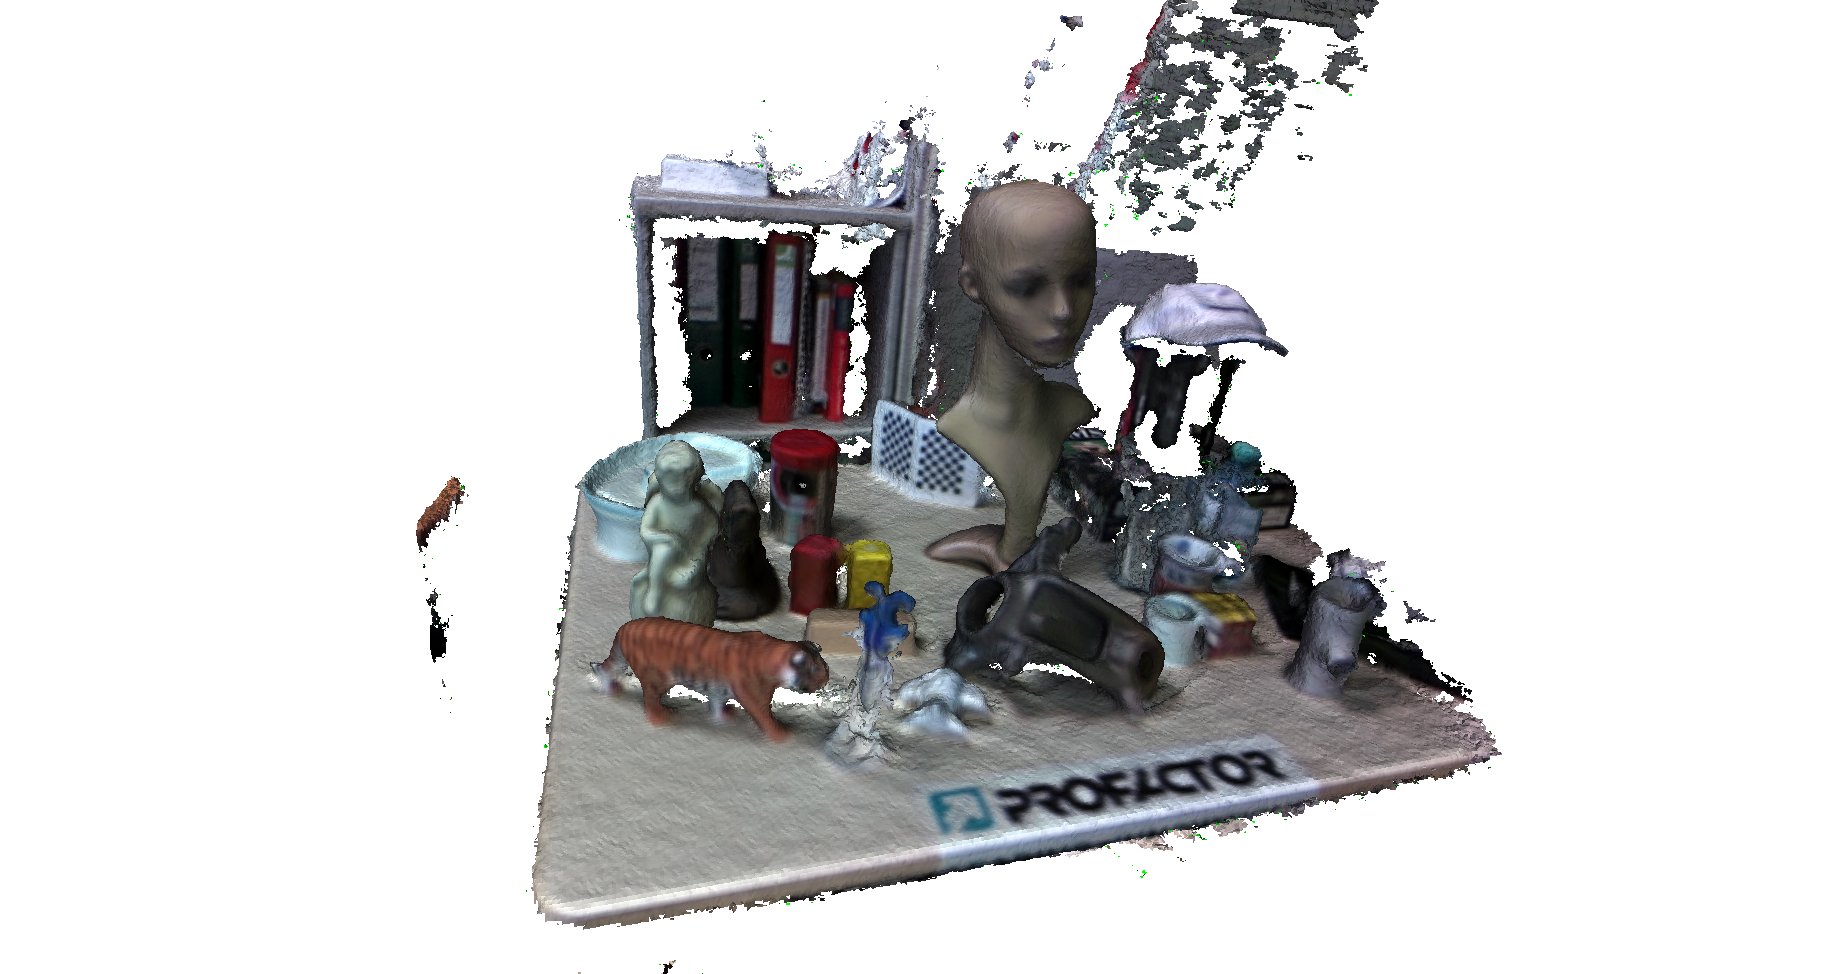
This produces an excellent high quality result. The colors are clearly defined, the tiger’s stripes are clearly visible, all 3D strucures are very well made. Excellent result for such a large scanning sphere! Unfortunately it is only possible to move very slow, because this setting takes a lot of resources and my AMD graphics card is not the fastest any more. That’s why we have also tried this setup on a brand new Nvidia Titan. Unfortunately we got blue screens whenever we used this resolution. We suspect that the Intel drivers still have a bug. When moving to a slightly lower resolution, 1280×720, everything worked perfectly. 60fps, color 640×480, depth 480×360This resultion is comparable to Asus Xtion’s data, except double the frame rate! Let’s see how ReconstructMe handles this. Optimize for reconstruction Speed
Oh my, this is incredible fast. Although the scan quality is obviously not the best, tracking performance is extremely fast. You can move the sensor very quickly without losing tracking, because the tracking calculations can be done much more often with such a high frame rate. This setup is recommended when you want to track your camera movement, and for quick previews. Balance reconstruction speed and quality
The quality of this reconstruction is comparable to the 30fps version. Although this has approximately the same quality, reconstruction is much faster, as there is much less data that needs to be transmitted to the GPU. I would recommend this setting for your regular reconstruction tasks. Maximize quality
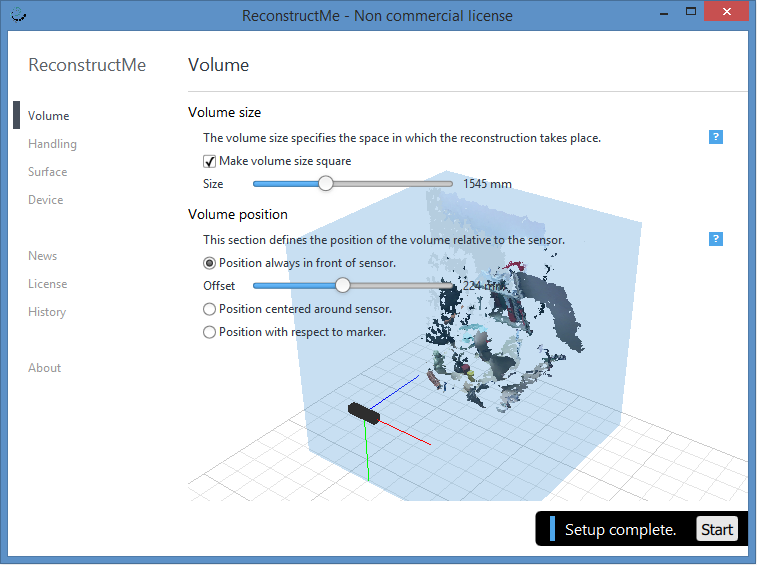
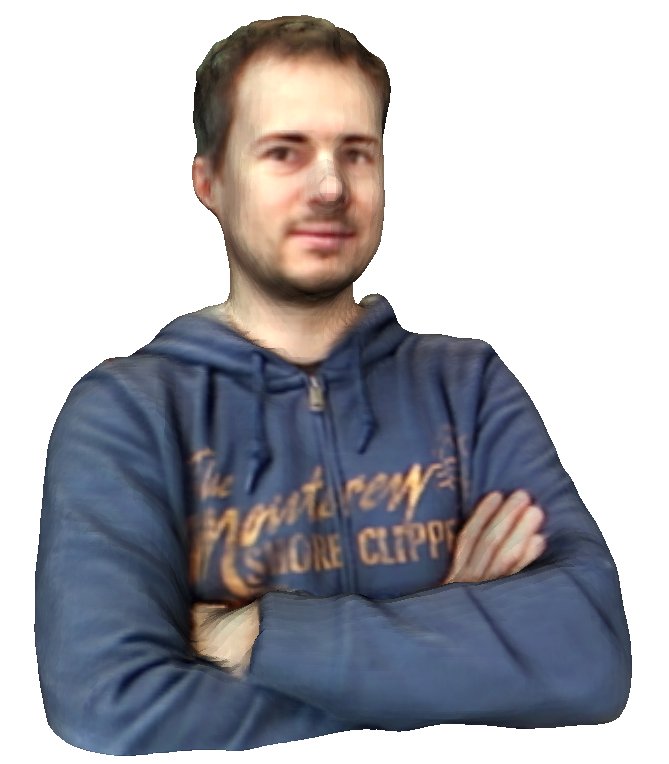
Interestingly, the quality of this reconstruction is highly similar to the 30fps one. It seems that the change of color resolution does not have much influence on the reconstruction quality, probably because the depth resolution is at a constant resolution at 480×360, so the higher resolution color does not give any additional information. Selfie ScanTo evaluate the quality and performance of selfie scans, we have configured ReconstructMe with the option Surface > [x] Selfie 3D Scan, then we have applied the selfie defaults. This sets the volume size to 1000mm, at a distance of 455mm from the sensor. Also, it automatically creates a watertight mesh and scales it ready for printing. I have scanned myself with two different settings: balanced quality and maximum quality, and I have used the 60fps sensor configuration as described above. Here are the results: Balance reconstruction speed and quality
The whole scanning process was quite fast, ReconstructMe really likes this configuration. The quality is quite good as well, colors are quite good and the model was reconstructed correctly. Unfortunately the R200 seems to have some problems with my hair, it came out a bit greenish in this setup. Overall, I’d say the scanning quality is very good with this setup, and also speedy. Maximize quality
With maximum setting reconstruction is much slower, so I had to rotate a bit slower so ReconstructMe is still able to track my position correctly. The resulting model has a much higher resolution, it increased from 250.000 triangles to 650.000 triangles. This also makes the color information a bit sharper. If you have a fast GPU, I recommend using this setting for your selfies. Note: All the screenshots are done with lightning enabled in Meshlab. The result is that all models seem a bit blocky instead of smooth, but the advantage is that this way it is a bit easier to evaluate the scan quality. When lightning is disabled, this is what the result looks like:
Conclusion
AvailabilityCurrently the R200 can be bought here. References
|
|||||||||||||||||||||||||||||||||||||||||||||||||||||||||||||||||||||||||||||||||||||||||||||||||