Author Archives: Christoph Heindl

About Christoph Heindl

I'm a professional software engineer working for PROFACTOR GmbH in Austria/Europe, the initiator of ReconstructMe and one of its main contributors. Reach me on LinkedIn.

ReconstructMe 1.2 using Carmine 1.09 High Detail

MagWeb just dropped us the following high-detail self-scan using ReconstructMe 1.2 and PrimeSense Carmine 1.09. He writes

Just to give some idea of what you can get with the new version and its Carmine 1.09 support: The attached results were done using Carmine 1.09 with glasses. Seems Carmine firmware (or OpenNi 2) performs some self calibration so adding glasses works fine without doing any external calibration

New Releases

We are proud to announce the newest release of ReconstructMe SDK and ReconstructMeQt. We’ve put a lot of efforts into both releases in the hope of making 3D reconstruction easier, more robust and versatile. Here is a video of ReconstructMeQt in action!

One of the major changes introduced in ReconstructMe SDK 1.4 is the addition of global tracking based on CANDELOR as reported in an earlier blog post. We find reconstruction much more robust with these algorithms in place. It also allows us to advance into new workflows such as point-and-shoot based reconstruction.

Secondly, we think that you are happy to hear that we have removed the forced tracking-loss limitation in the unlicensed version. The limitation is replaced artificial spheres generated into the output mesh.

Our graphical user fronted ReconstructMeQt 1.1 has received a couple of major usability improvements. You are now able to preview the surface directly, decimate before saving the mesh and choose among different rendering options.

As always, you can read about all changes at the corresponding release logs (ReconstructMe SDK, ReconstructMeQt).

Happy reconstruction!

CANDELOR – Robust Global Tracking

candelorWe are proud to announce that ReconstructMe teamed-up with CANDELOR, our in-house solution for robust and fast object localization, to significantly improve the tracking experience of ReconstructMe.

The integration of CANDELOR allows us to greatly improve the following aspects of ReconstructMe

Recovery of Camera Tracking

Until now, ReconstructMe assumed that the camera movement between subsequent frames is rather small. Violating this constraint threw ReconstructMe off the track and a manual re-location required the user to position the camera very closely to the last recovery position. While this mode works most of the time it can be tedious to find the correct position manually.

With CANDELOR we can weaken this requirement as its algorithms allow us to determine the correct camera movement for large displacements. This is possible as CANDELOR searches for similar features in the 3D data of the recovery position and the current sensor frame. Given a set of corresponding features a transform can be estimated that reflects the searched for camera movement.

The video below shows tracking with CANDELOR enabled and directly compares tracking performance with and without CANDELOR enabled reconstruction.

As one can see in the video recording of data is paused multiple times and the resume position is far off from the paused position. Despite the displacement of the camera, tracking is successfully recovered by CANDELOR.

Automate extrinsic calibration of multiple sensors

A nice benefit of using CANDELOR is that it now has become very easy to use multiple sensors working on the same volume. In traditional multi-sensor applications one requires a good estimate of the so called extrinsic calibration. That is the transformation between two cameras. This extrinsic calibration is often assumed to be fixed and not allowed to change.

ReconstructMe works differently. The initial extrinsic calibration of multiple cameras is automatically calculated by CANDELOR. Once both sensors have registered you can freely move the cameras into different locations. They will maintain calibrated via the data you record. The unique advantage is that multiple sensors can scan more quickly (divide and conquer).

In the following video you can see Christoph and me scanning a person using multiple cameras that work on the same volume.


Point-and-shoot 3D object reconstruction

We’ve added a new reconstruction mode based on global tracking: Point-and-shoot. It means that reconstruction of objects is performed only at specific manually picked locations. Especially for users with low-powered GPU/CPUs will benefit from this mode as it allows you to capture an object with very few positions. The video below shows how it works.

Despite the fact that only few positions are used for data generation, the model looks quite smoothed and closed.

We are confident that the new features will ship with the upcoming SDK and Qt within the next two weeks.

Happy reconstruction!
The ReconstructMe-Team

Merry Christmas and a Happy New Year

Dear All,

the ReconstructMe team wishes everyone a Merry Christmas and a happy new Year! Together, we’ve reached a lot in this year, pushing forward the state of the art in 3D reconstruction. Although not everything we intended to do made it in time, we hope we can catch on that in the new year. Here’s an outlook for 2013 and summary of the past couple of weeks:

Area based Stereo Vision
We’ve teamed up with an Austrian based company that provides real-time dense area based stereo vision systems for arbitrary dimensions. Those systems can be operated in active and passive mode and scaled according to the scanning requirements. The image below shows one of the first scans of a peanut.

Peanut

This is the first evidence ever made that ReconstructMe can scale for arbitrary dimensions. The sensor input dimension is micro meters (0.001 mm).

LEAP
We received note that we have been accepted by the LEAP developer program. From a first glimpse of the SDK it seems like the API does not yet provide the necessary data to perform real-time reconstruction, but we hope that the missing features will be added within the 1st quarter of 2013, so we can start working on integration.

We will be back on January 2nd 2013.

All the best,
Christoph

Fiere Margriet

Amazing projector project by Mark Florquin uses ReconstructMe for 3D scanning:

We projected the story of ‘Fiere Margriet’ on a small but charming street (Eikstraat), during Leuven in Scène 2012. ‘Fiere Margriet’ (Proud Margriet) is an old legend from Leuven. In short it tells the story of a young lady who gets mugged and killed by a gang of thieves. They dump her into the main river in Leuven, De Dijle. Her body doesn’t sink however, but floats miraculously upstream, surrounded by a magical light.

In their making-of video gives an idea on how ReconstructMe was used to digitalize the womans body in different poses.

ASUS Xtion USB 3.0 Hotfix

Today ASUS sent along a RD version of a patch that should resolve the Xtion USB 3.0 issue. I’ve been given permission to distribute this file on a no-warranty-of-any-kind basis. In order to apply the patch download

[wpdm_file id=63]


Extract it to a folder of your choice, attach the sensor to an USB 2.0 port and execute UsbUpdate!Update-RD108x!.bat. Once that step has completed successfully your sensor should work on USB 3.0.

According to ASUS there was an issue with ASmedia USB3.0 controller(ASM1041/ASM1042), which can be fixed by ASmedia’s new driver(1.16.1.0) and firmware(12220E). I assume the content of .zip file updates the driver and the firmware.

I’m very grateful to ASUS that ReconstructMe users are among the first to receive this patch! Please report back your results, so I can give feedback to ASUS.

Thanks,
Christoph

ReconstructMe SDK 1.0 Released

As of today ReconstructMe SDK 1.0 is available for commercial and non-commercial use. ReconstructMe SDK is designed for a broad band of applications. It targets simple real-time reconstruction applications and scales up to multiple sensor projects.

Design

We spent a lot of time in designing the API as we wanted it to be as easy-to-use as possible without limiting the possible flexibility. After dozens of approaches and evolutionary prototypes, we’ve settled with a design that we think accomplishes the following main goals

  • easy-to-use A generic and consistent API allows you grasp the concepts quickly and develop your first reconstruction application within minutes.
  • easy-to-integrate The API comes as a pure C-based implementation without additional compile time dependencies. Interopability with other programming languages  is easly possible.
  • high-performance The SDK is designed to provide a maximum performance for a smooth reconstruction experience.

Real-time 3D reconstruction is complex. We tried to hide as many details as possible about the process to allow you to concentrate on application programming.
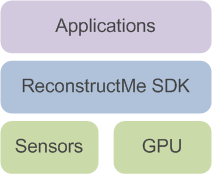
Availability

The ReconstructMe SDK is available for non-commercial usage (with some limitations) and commercial usage. Both feature the same functionality, but the non-commercial version is limited in some aspects. See our project page for details. The package comes bundled with an installer that allows you to install the necessary sensor drivers on the fly (note that the drivers are not included, but downloaded remotely from our site).

ReconstructMe SDK is currently compiled for Windows 32bit using Visual Studio 10.

Interoperability

Getting reconstructme to work in other programming languages is easy. We added an example to demonstrate the case for C#. We’d like to add binding for all common languages, but obviously that is a task that requires the help of the community. If you’d like to contribute to a binding drop us a note in our development forum.

Example

Here’s a very first introductory example into the C-API copied from the reference documentation. The example shows how to perform real-time reconstruction using a single sensor. Besides, built-in real-time visualization and surface visualization is used. The final mesh is saved in PLY format.

Here’s the corresponding code

// Include the necessary headers
#include <reconstructmesdk/reme.h>
  // Create a new context
  reme_context_t c;
  reme_context_create(&c);

  // Compile for OpenCL device using defaults
  reme_context_compile(c);
  
  // Create a new volume
  reme_volume_t v;
  reme_volume_create(c, &v);
  
  // Create a new sensor. Tries multiple backends using default
  // sensor configurations, returns the first working one. By default 
  // each sensor works on the first volume created.
  reme_sensor_t s;
  reme_sensor_create(c, "openni;mskinect;file", true, &s);
  reme_sensor_open(c, s);

  // For debugging purposes open a viewer for tracking the reconstruction process.
  // This will create a two-sided viewer showing the video stream and the current
  // reconstruction from the sensor point of view.
  reme_viewer_t viewer;
  reme_viewer_create_image(c, "This is ReconstructMe SDK", &viewer);
  reme_viewer_add_image(c, viewer, s, REME_IMAGE_DEPTH);
  reme_viewer_add_image(c, viewer, s, REME_IMAGE_VOLUME);

  // Perform reconstruction until no more frames are left
  int time = 0;
  while (time < 200 && REME_SUCCESS(reme_sensor_grab(c, s))) {

    // Prepare image and depth data
    reme_sensor_prepare_images(c, s);

    // Try to determine updated sensor position.
    // On succes, update volume, otherwise move to a recovery position
    // and wait for the tracking to start again.
    if (REME_SUCCESS(reme_sensor_track_position(c, s))) {
      
      // Update volume with depth data from the 
      // current sensor perspective
      reme_sensor_update_volume(c, s);

    }

    // Update the viewer
    reme_viewer_update(c, viewer);
    time += 1;
  }

  // Close and destroy the sensor, it is not needed anymore
  reme_sensor_close(c, s);
  reme_sensor_destroy(c, &s);

  // Create a new surface
  reme_surface_t m;
  reme_surface_create(c, &m);
  reme_surface_generate(c, m, v);
  reme_surface_save_to_file(c, m, "test.ply");
  
  // Visualize resulting surface
  reme_viewer_t viewer_surface;
  reme_viewer_create_surface(c, m, "This is ReconstructMeSDK", &viewer_surface);
  reme_viewer_wait(c, viewer_surface);

  reme_surface_destroy(c, &m);

  // Make sure to release all memory acquired
  reme_context_destroy(&c);

  /** [Example Code] */

For more examples please visit the documentations’ example page.

Happy reconstruction!
The ReconstructMe Team.